This video and written guide covers how to analyse wallet transactions and token-tracker pages on Etherscan, the leading block explorer for Ethereum. Worked examples are included.
READ: What Are Block Explorers?
Homescreen
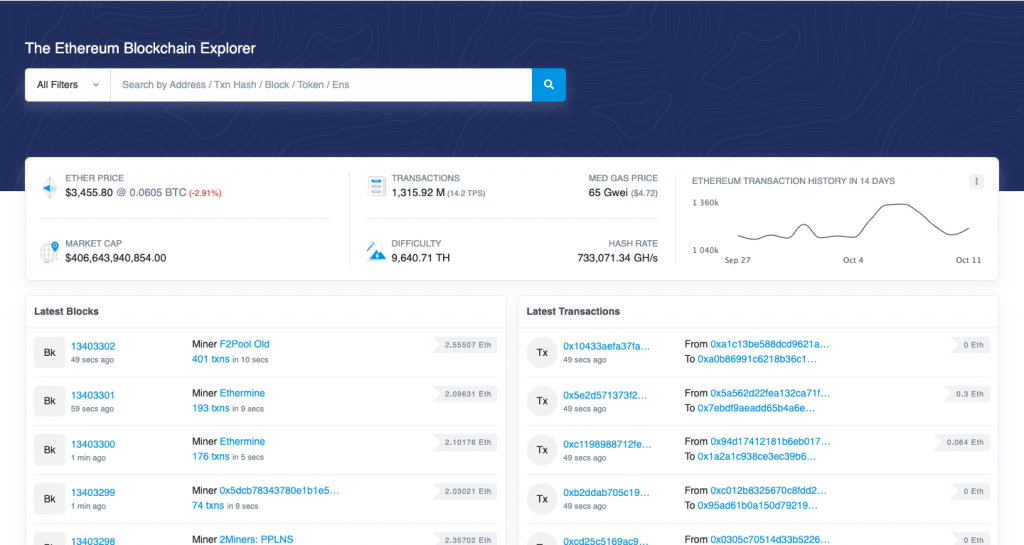
The Etherscan landing page offers a broad overview of the Ethereum network. The landing page contains information about the price of ETH, median gas price, as well as transactions and hash rates. This page can be a good resource for high-level network information, however the power of Etherscan lies in the ability to analyse individual wallets and tokens.
Address Page
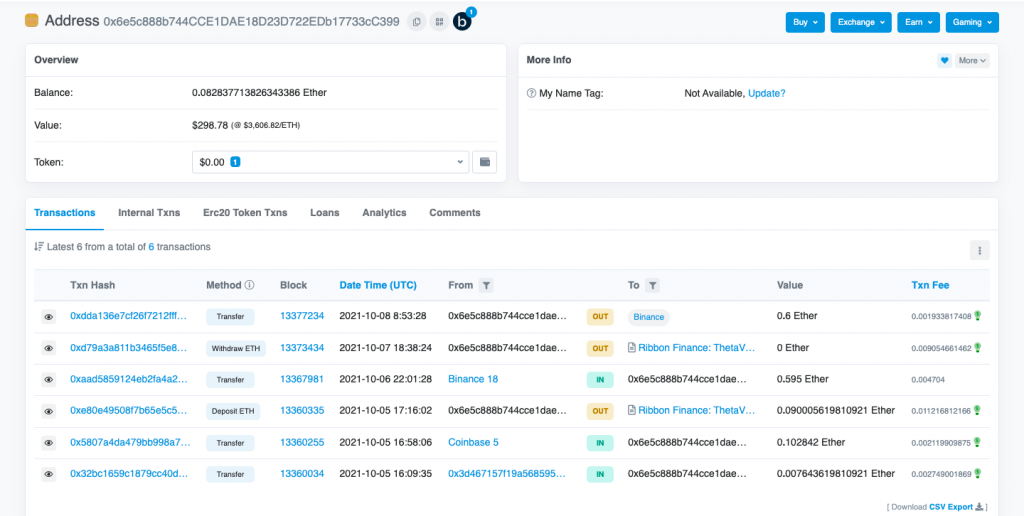
Use the search bar in the top right-hand corner of the home screen to navigate to an individual address page. You can enter the address of any wallet or smart contract address on the Ethereum blockchain. Entering an address will take you to an address landing page.
An address page contains an overview of the addresses assets such as ETH balance and the value of all the ERC-20 tokens held by that address. The address page also has different tabs relating to transaction categories. The primary transaction categories are as follows:
- Transactions: Transactions triggered by external addresses. External addresses can generally be thought of as user wallets.
- Internal Transactions: Transactions triggered by internal addresses. Generally, internal transactions are transactions triggered by smart contracts.
- ERC-20 Transactions: The ERC-20 transactions table shows any transaction where an ERC-20 token was involved.
- ERC-721 Transactions: Similar to the ERC-20 transaction table, ERC-721 transactions show any transactions using ERC-721 tokens. Generally, these will be NFT transactions.
Example of Analysing Transactions
The following scenario can shed light on the difference between each transaction category.
Example scenario
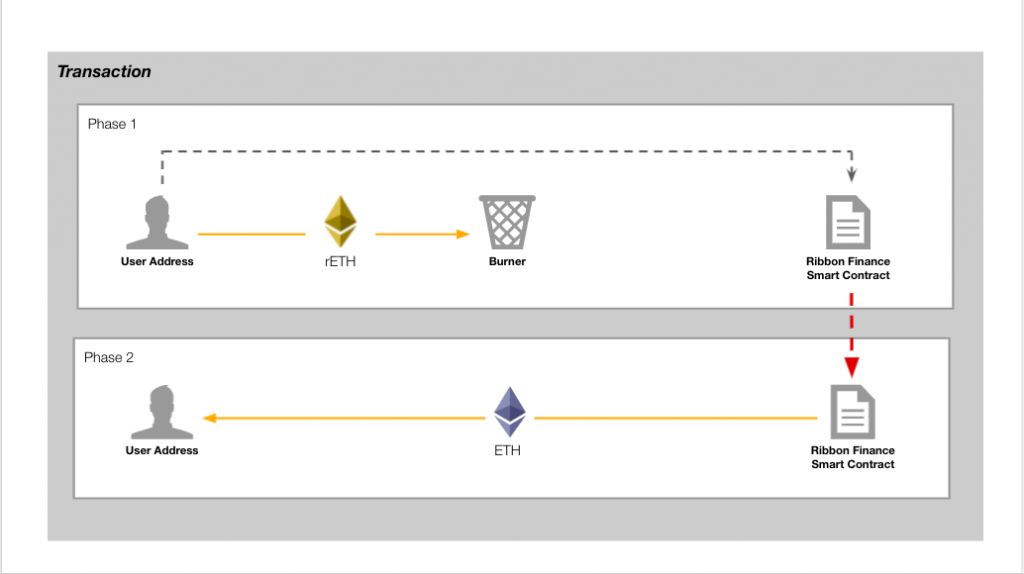
For example, you have 1 rETH, an ERC-20 token representing a claim to an ETH deposit in a Ribbon Finance Vault. You decide to withdraw the ETH deposited in the Ribbon Finance vault. The below figure displays how the transaction is being executed on a high level.
It is easiest to conceptualise the transaction as 2 phases. Phase 1 is you burning your rETH and alerting the Ribbon Smart Contract that you want to withdraw your deposited ETH. Phase 2 is the Smart Contract being triggered to your ETH from the vault to your wallet.
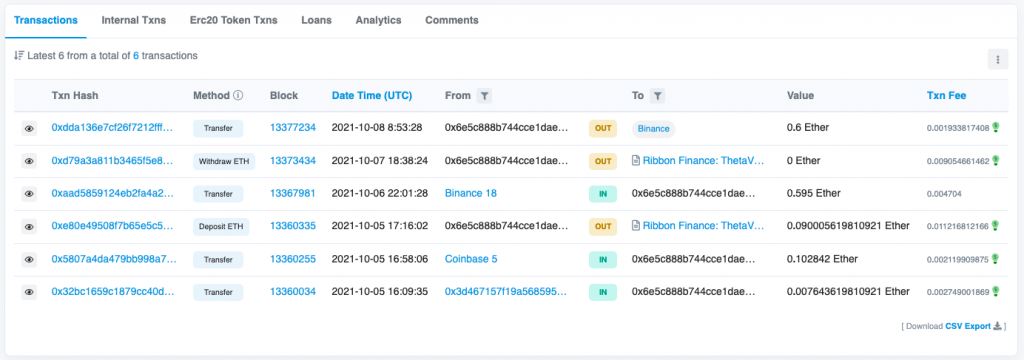
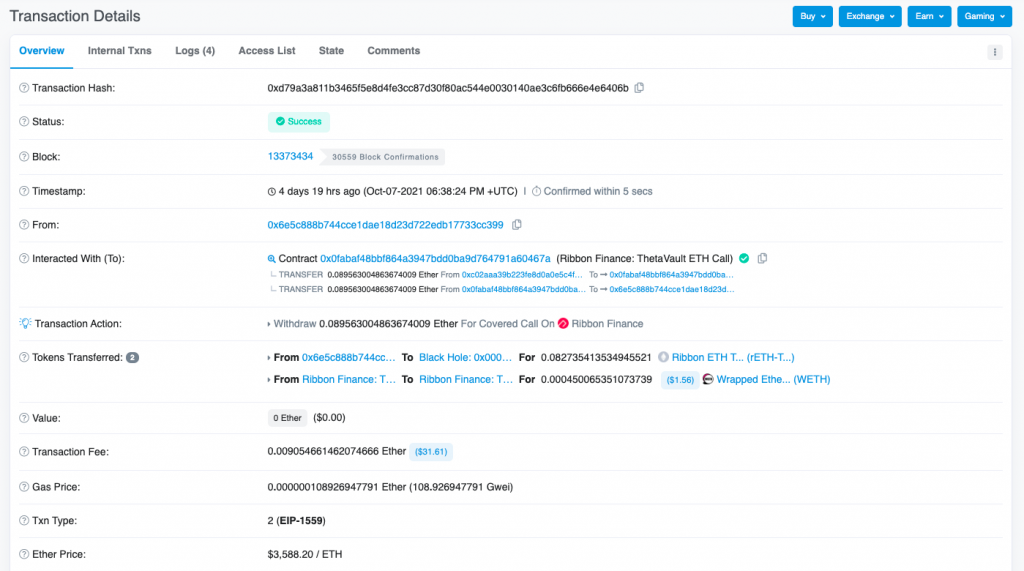
Viewing this transaction on Etherscan, you can see different phases of the transaction have appeared in different transaction tabs. Phase 1 is in the first Transactions category on Etherscan. Phase 1 appears here because Phase 1 is triggered by an external user (you). It is also considered an ‘outbound’ transaction because it is displaying you removing rETH from your wallet. Phase 1 can also be seen in the ERC-20 Transactions tab because the transaction involved an rETH which is an ERC-20 token.
Phase 2 has appeared under Internal Transactions because it was triggered by the Ribbon Smart Contract. The contract recognised you burning rETH as a trigger to send you ETH in exchange.
If you look at the transaction hash of all three entries you will notice that it is the same. This is because despite the transaction being broken into multiple phases it only required you to sign one transaction. Clicking on the transaction hash will direct you to a transactions page where you can see an overview of the transaction.
Token Contracts
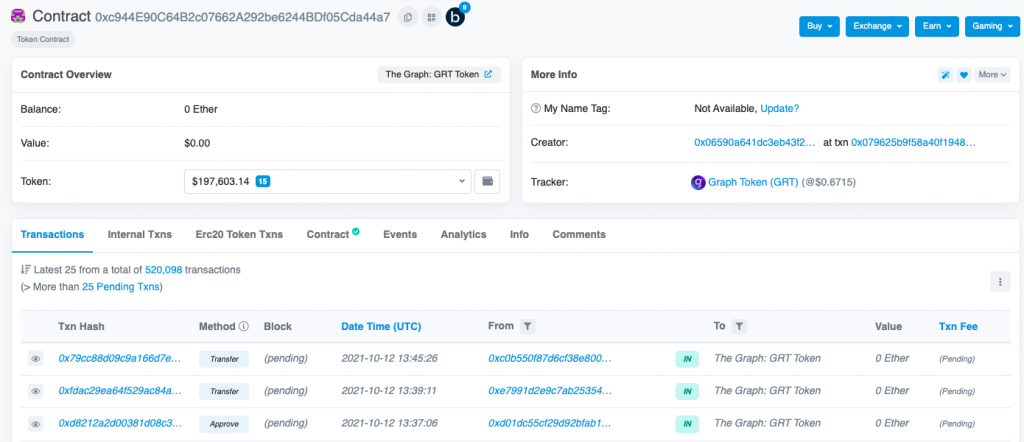
Token contract pages are another excellent resource on Etherscan. You can find a token contract page by using the Etherscan search bar and searching for the token by address or token name. After selecting the token you are directed to the token contract page.
The token contract page is very similar to an address page. The page shows an overview of the contracts ETH balance, token balance, as well as any transactions. However, there is also a link to the Token Tracker page.
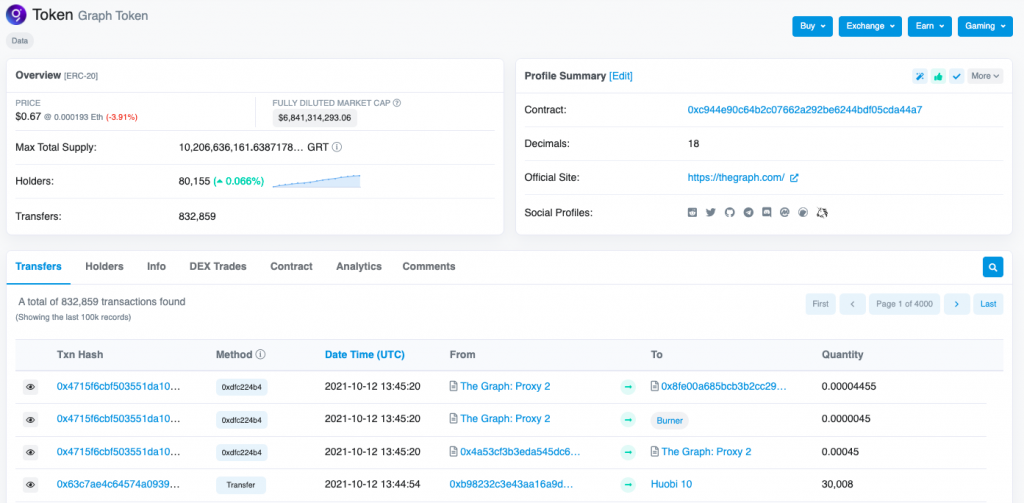
The token tracker page displays key information regarding the fully diluted market cap for the token, total token supply, number of holders, number of on-chain transactions, as well as recent transactions and recent DEX trades. You can also filter transactions based on wallet address. This will only display transactions involving the selected token and wallet address.
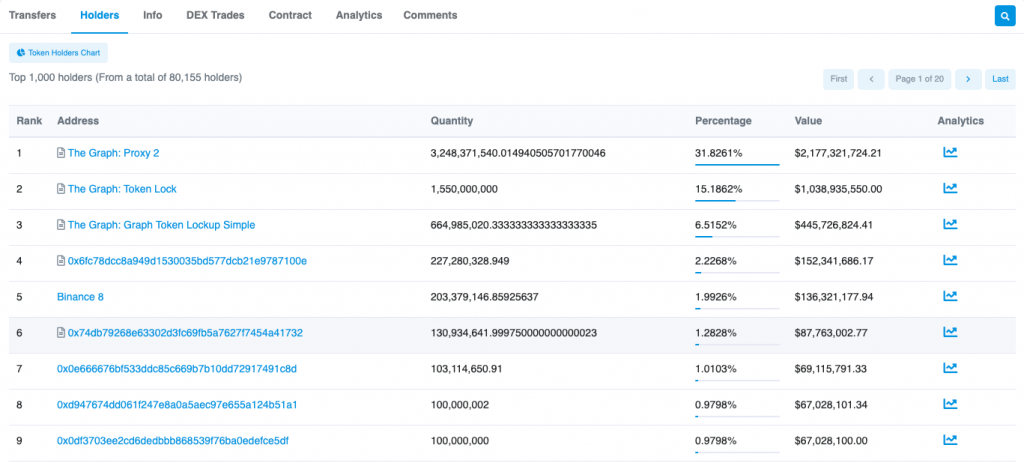
Lastly, a particularly popular tool on Etherscan is the ‘Holders’ tab which shows the distribution of tokens amongst holders. Here, you can analyse if the ownership of the token is concentrated into a few holders and also which smart contracts hold a percentage of token supply.
Putting It All Together
To demonstrate how Etherscan can be utilised in a practical setting, we will analyse Shiba Inu Coin (‘SHIB’). One of SHIB’s selling points is the claim that 50% of the token supply was sent to Vitalik Buterin—the creator of Ethereum—and 50% of the token supply was placed in a Uniswap pool and the LP tokens burned. We are going to use Etherscan to test the validity of these statements.
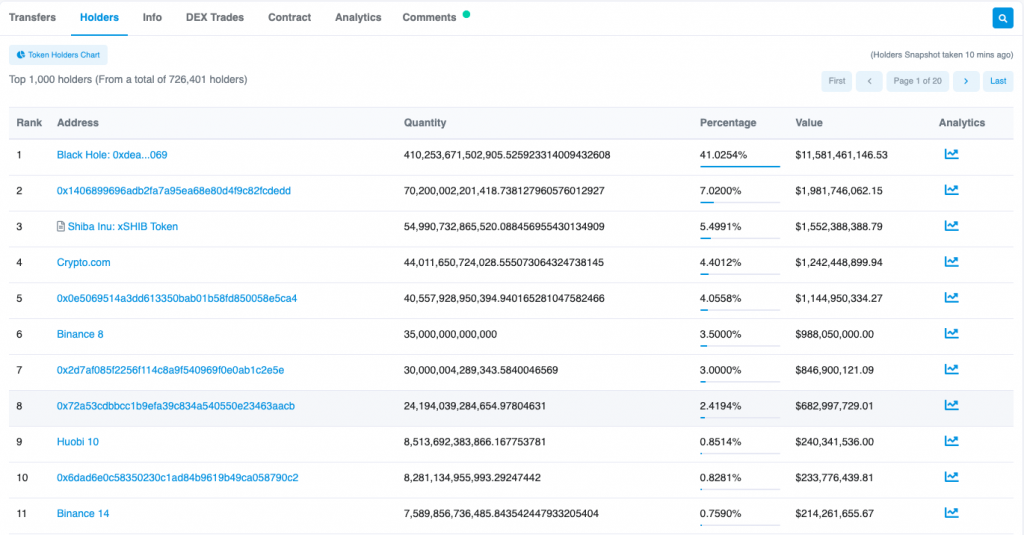
We will start by finding the SHIB token on Etherscan. Using the search function, we can navigate to the SHIB token tracker page. We will start our analysis by viewing the ‘Holders’ tab on the token tracker. We would expect 50% of SHIB to be held by Vitalik and a significant proportion held in a Uniswap pool.
Clearly, Vitalik does not hold 50% of the supply and there is not a Uniswap pool with significant SHIB holdings. Further analysis is clearly required to understand the distribution of SHIB.
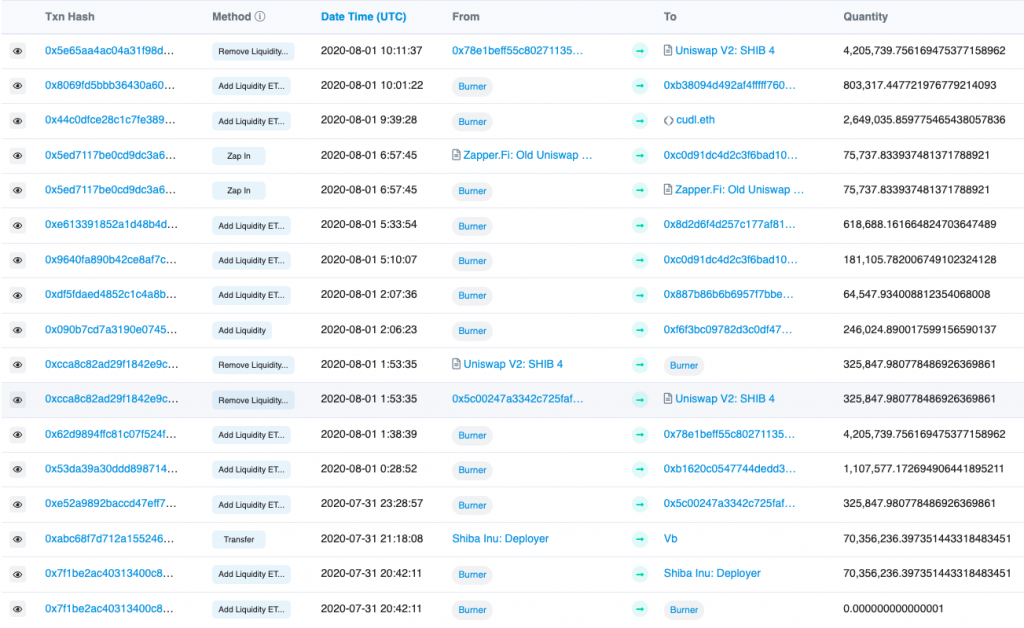
We can begin our further exploration by examining the Uniswap SHIB/ETH pool. You can find the SHIB/ETH pool address online and find the contract page on Etherscan. From the contract page, navigate to the available token tracker. The token tracker tracks the LP tokens representing a claim to the SHIB/ETH pool. By analysing the LP token, we can better understand if 50% of the SHIB token supply was used as liquidity and if the LP tokens were burned.
The first 3 transactions (i.e. bottom 3 on the table) provide us with the information we need regarding the 50% token supply. The transaction from the ‘Burner’ to ‘Shiba Inu: Deployer’ represents the initial minting of LP tokens. Viewing the parent transaction hash we can see half of the SHIB supply along with 10 ETH was deposited as the initial liquidity in the pool. Immediately following the minting of the LP tokens, they were sent to Vitalik’s wallet. This represents the hypothetical burn of the LP tokens. We now know Vitalik has control over a large portion of the SHIB liquidity pool and possibly also held 50% of the initial SHIB supply.
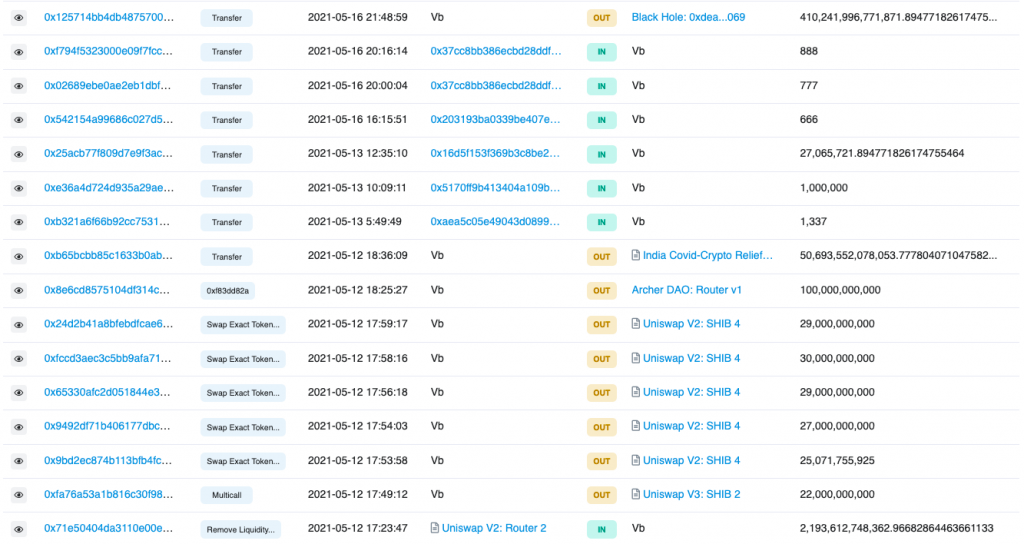
Filtering Vitalik’s transactions to only show SHIB transactions tells the full story of his interactions with SHIB. Firstly his first SHIB transactions were the SHIB Deployer sending half of the SHIB supply to his wallet (not pictured). This verifies 50% of the SHIB supply was sent to Vitalik and 50% supplied to a Uniswap pool as originally claimed.
However, Vitalik took actions unexpected by the SHIB community. Firstly, Vitalik used the LP tokens sent to him to withdraw funds from the liquidity pool. Following this, transactions with ‘Uniswap V2: SHIB 4’ show Vitalik swapped SHIB for ETH from the pool, essentially removing all ETH and therefore liquidity for the token. Despite swapping SHIB for ETH, Vitalik still held almost 50% of the SHIB supply. Vitalik then donated to the Indian COVID Relief Fund before burning his remaining supply.
Summary
This resource aimed to provide members with a basic understanding of Etherscan and how Etherscan can be used to analyse major events using on-chain data. Many of the tools outlined above will be applicable to other block explorers such as Polyscan, Solscan and other layer ones (‘L1s‘).
